Your Cart is Empty
Malaysian customers, please select Bank Transfer. PayPal transactions incur a 4.4% fee plus RM2.
Malaysian customers, please select Bank Transfer. PayPal transactions incur a 4.4% fee plus RM2.
It’s time to get creative and start a little business of yours with your polymer clay blocks! Thanks to the versatility of the medium, polymer clay is very flexible to work with.
You can mix different colors together to get customized color and designs, and you will still be left with endless possibilities.
Here are our 15 DIY polymer clay project ideas which you can make at home and sell them:
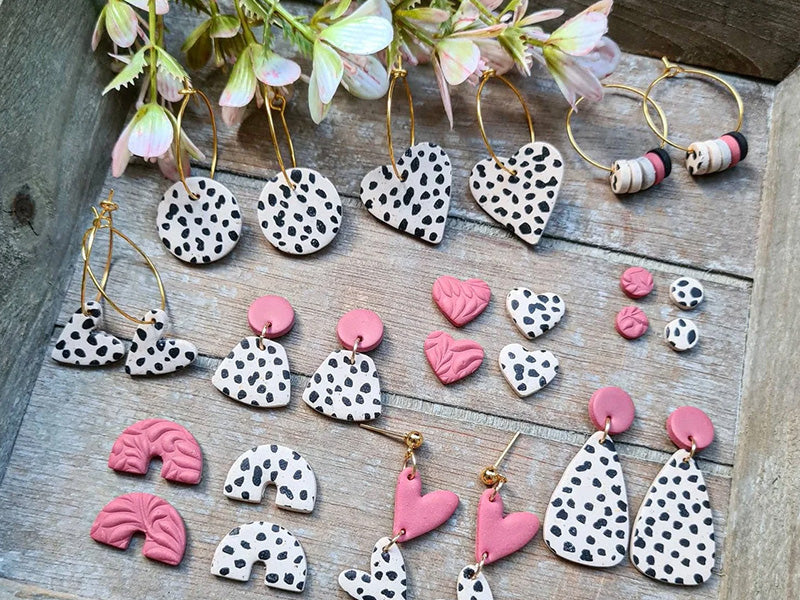
Earrings: these are sure to sell! If you have daughters, girl cousins or friends, invite them over for a fun project and you will be surprised to see cute results of polymer clay handmade earrings.
You will require basic tools to get started such as polymer clay in different colors, polymer clay acrylic roller and fishhook earrings which are both available on our website, and our Hobby Craft Akto Knife.
If you do not have the exact tools, don’t worry. You can substitute them with any available objects at your home. Now let your imagination go wild!
You can first draw earring designs on paper. Come up with unique ideas and then pick your colors. Combine different colors of polymer clay together and start conditioning them.
Rainbow arched shaped earrings, textured, and flat slab earrings are some of the fun ideas to start with.
If you like floral designs, animals or simple hoop earrings, then definitely try them out. Prepare your workspace.
Lay down parchment or wax paper on your table on which you can roll and flatten your polymer clay.
Like any other polymer clay sculpture, your earrings also have to be baked. Remember to poke small holes in your clay earrings to attach fishhook earrings after baking.
You can use a needle or a toothpick to do that. Just make sure the diameter is big enough to insert the ring. Check out our Cat Pendants Charm handmade acrylic earrings for inspiration.
Keychains: the process of making a keychain is very simple and almost the same as making a pair of earrings. You can simply replace fishhook rings with keychain and eye pin screw (please check them out on our website) after you are done baking your polymer clay pieces.
You can make clay monogram keychains, floral designs, textured patterns, and flat marble pieces. The possibilities are endless.
Here is our basic polymer clay keychain tutorial for you to try out:
For rainbow arch shaped keychain, take any two colors (let’s say pink and purple). Take a piece of conditioned purple polymer clay and start rolling it with your hands to form a snake.
Then take the snake and curve it to form a semi-circle. It will form an arch. Repeat the same process with pink polymer clay and curve it under the purple piece to form another arch/semi-circle. Cut the extra part with clay cutter or exacto knife.
Poke a hole at the top and put your piece in the oven for baking. Once baked, take it out, use pliers to attach the key chain and pin screw through the hole and tada! Your very own handmade polymer clay keychain is ready.
Fridge magnet: As mentioned above, there are endless possibilities when it comes to being creative with polymer clay. Here’s another cool project for you to try out: fridge magnets.
Again, very easy to make. You can mix various colors together or even paint acrylics on polymer clay pieces to achieve your desired design.
For this, you will require some magnets and glue. Once you are finished making your pieces, put them in the oven for baking.
Take them out and let cool. Glue magnet to the polymer clay pieces at the back (remember not to glue the side which needs to get attached to the fridge), and your project is ready!
Put your magnets on the fridge and you can also use them as holders to attach your family pictures to the fridge. Simple, right?
Planter pot: Are you a plant lover? Want to decorate your balcony with beautiful succulents? Here is another fun DIY project to personalize your succulents. You can easily make planters for your succulents out of polymer clay.
Roll a ball and three sausages of equal sizes as legs for the pot. Flatten the ball using a rolling pin. Add design to it by adding other colors of polymer clay pieces and squish them into the flattened ball.
Take our Ball Shaped High Gloss Silicone Mold or Hexagon Succulent Planter Pot Silicone Mold and mold the clay in it. It will help retain the shape while baking.
Attach the sausages to the base and make a drainage hole at the bottom. Since polymer clay is waterproof, the drainage hole will allow the water to flow out to keep the succulents healthy.
Now bake it in the oven. Allow it to cool and add damp soil in the polymer clay pot. Take tweezers to make tiny holes in the soil and gently plant your succulents.
Cover with gravel. Press the gravel firmly to secure the soil and plants, and your adorable planter pots are ready to impress everyone!
Rings: Rings are the easiest to make and you can make tons of them in one sitting. They can be in various sizes and designs, could be funky or elegant. The vibe is up to you.
If you’re making them for yourself, roll out polymer clay according to the size of your designated finger.
Once you are done baking your rings, you can paint on top of them or can also apply a coat of clear nail polish for a glossy look.
Hair clips: This is a cute addition to your hair accessories and something which girls love to purchase. Similar to fridge magnets, you will require hair clips such as alligator clips instead of a magnet. They are easily available in stores.
Once your polymer clay hair clip is finished baking, allow it to cool. Apply glue with a toothpick on the backside of the polymer clay piece and gently press it down on the clip. Allow it to dry and your hair clip is ready.
Decorative pins: similar to hair clips, you will need brooch pins instead of alligator clips. Start experimenting with different designs. Roll, flatten or curve your designs accordingly. Bake them, take them out, allow them to cool, and with the help of glue, attach your polymer clay pieces to brooch pins.
They can be used to pin up sashes in little girls’ dresses or to add a decorative element to gift boxes. You can pin the ribbons together with decorative pins on the gift box or sell them as a collection!
Coasters: With every DIY project, the steps are the same. Take two colors of polymer clay, black and white for example. Roll each piece into thick, long snakes of equal sizes.
Twist them together and roll them into a ball. Take your rolling pin and roll out the polymer clay ball.
Now use a cookie cutter to cut the desired shapes. We have a wide range of cookie cutters available such as Round with Wave Shape 6 pcs Cutter Set.
And finally bake! Your handmade polymer clay coasters are ready.
Paperweight: Whether you require paperweights or not, they can be a great addition to your polymer clay pieces and can go up on your shelf as well.
Get as creative as you can. Make fun shapes and objects, and you can also personalize your paperweight by adding alphabet, name, or date on them with stamps.
Once you have baked them, go crazy and paint the paperweights with acrylic paint. When they are completely dry, finish the look with a sealer.
You can use mod podge to seal them which gives a glossy look. You can easily get mod podge from our website.
Ring stand: You just finished making your polymer clay rings. How about put them on display with another fun DIY project?
Polymer clay ring stand is another creative and easy assignment for you to experiment with. Give it a cone shape with two-color marble effect or you can even make a cute cactus as a ring stand.
Oh, if you’re making a cactus with two or three hands, why not also hang your necklace or pendants on it?
Ring dish: Ring dish are not only easy to make, but look beautiful as center table décor piece or as a gift. You only need a few things. Choose two or three colors of polymer clay of your choice.
After conditioning them, roll out a base color. Take pieces of other colors of polymer clay and sprinkle on the rolled out clay piece, and roll again.
Now cut the bowl shape out of it using a cookie cutter. Place it in an oven proof bowl or use our Ball Shaped High Gloss Silicone Mold to form a bowl shape and bake.
Allow it to cool and then take it out of the mold. Use our Matador German Warriors Waterproof Sandpaper to smooth out the edges of the dish and it’s ready!
Clay mugs: these are again very easy to make, but just require a little extra effort. Here is our recommended technique of making your very own polymer clay mug:
Take about 400 grams of polymer clay which will be sufficient to make a small size mug. Condition it well and start making a ball.
Now using the ‘pinch pot’ technique which is pinching the top of ball with your thumb, keep turning the clay ball and do not stop pinching in until you make a big hole.
Keep the pressure of your hand even and form a mug shape. Now roll a snake for handle and attach it to the mug.
You can take a different color of polymer clay and make small flowers and attach to the mug or glue them late, and bake away!
Once cooled down, use the sand paper to even out the edges and surface, and your very own polymer clay mug is ready.
Candle holder: there are so many options when it comes to making candle holder. They can be coiled or can be a simple cup type shape.
Just make sure you have a candle to test the holder’s size and the whole process is exactly the same as making any other polymer clay objects.
Necklace: Necklaces are just super fun and have endless possibilities with thousands of designs to experiment with.
If you are a beginner, here is a simple polymer clay bead necklace tutorial for you:
Start with two colors. Make balls of your desired size and poke holes in them with a toothpick. Poke evenly through the both ends. Make about 6 to 7 beads.
Bake them in the oven and allow to cool. Now take your leather cord and cut it into the desired length of necklace.
Insert the cord through the beads and tie a knot at the end, and the necklace is ready. We have Leather Cords with Lobster Clasp and Flat Faux Leather Cord Necklace with Vintage Clasp which are ideal for your polymer clay necklace project.
Festive ornaments: you can easily make festive ornaments out of polymer clay yourself and make the task of decorating your house more exciting.
Whether it’s Christmas, Hari Raya, Chinese New Year or Deepavali, make anything and everything out of polymer clay.
You can make Hari Raya Ketupat keychain or simply tie thread at the top of the piece and hang it in your home.
Or roll and flatten out green polymer clay, use Christmas tree cookie cutter to cut out the shape and bake it, and hang it with a thread in your Christmas tree.
You can make cute Chinese Zodiac signs such as tiger, snake or pig and sell them as keychains, brooch pins or gift them to kids.